Wednesday, December 28, 2011

Production volume rendering

For a few weeks, I've been studying and writing some code 

All the code is available here.

The first part of the project is implementing noise functions, textures, 
rasterization and instantiation primitives, that are the building blocks 
of many of the algorithms described in the courses.


A solid noise point rasterization primitive, 
visualized and renderered in Houdini.

For the second part of the project, I'm writing a ray marching volume renderer.
While the design of the renderer is classic, borrowing ideas from pbrt, 
the renderers described in the course notes and some of my own, 
the implementation is more interesting, based on runtime concepts
instead of normal C++ polymorphic classes.


First image produced with my volume renderer, 
accumulated opacity of a MRI scan of an orange.
Dataset courtesy of the volume library.


Sphere, box and two pointlights. 
The artifacts are due to no antialiasing, and big step size.

Sunday, October 16, 2011

Alembic Exporter for Blender ( work in progress)

Binary package for 64 bits Linux: http://graphicall.org/625
A patch against blender svn trunk code is included in the package.
It's written in C++, so it's quite fast.


Features:

- object hierarchies.
- custom properties are saved as uniform geoParams or user data.
- meshes and subdivision surfaces with modifiers, uvs, vertex colors, edge creases, ...
- material indices and facesets for Maya.
- fluid meshes export, with per vertex velocity.
- frame relative sampling for better motion blur.

Not working yet:

- particles. It seems there are some problems with subframe access to particles.
- Nurbs, curves, Metaballs and Text objects.
- dupliverts, duplifaces and other dupli options.
- dynamic paint vertex colors: Didn't have time yet to test it fully. It doesn't work for me.


current exporter options.


First? exported Alembic archive from Blender.


A more interesting example.


One of the recently released Project London rigs imported into Houdini.

Thursday, September 22, 2011

Cortex and Blender

Binary package for 64 bits Linux: http://graphicall.org/625

Some simple examples:

Import and export cortex objects and attribute caches (meshes only).

Applying ops to objects (CortexOcean Op).


Creating light domes from HDR enviroment images.


Python procedurals for 3Delight .


Wednesday, August 3, 2011

Thursday, July 14, 2011

Release 0.8.2, Blendernation article, ...

Yesterday, I released 0.8.2. Unfortunately, I just found some bugs 
I'm currently fixing, so this release will be short lived. 


New things include:


- New expression editor for GenerateX, ColorX, ... 
- Updated most third party dependencies.
- The Resize node is now faster, has better quality,  and had a number of  bugs fixed.
- PySide is now bundled with Ramen.


- CUDA is detected and initialized at startup if you have a suitable GPU.
If you have an ATI card, Ramen should still work ok, but I can't really test 
it. Can anyone confirm it?


- Bug fixes and other general small improvements.


Ramen was featured in Blendernation this week. It was completely unexpected.
The response was amazing. We had 8000+ pageviews and almost 500 
downloads in just two days. Probably, a better website is needed for the project.


I'd like to thank the people at Blendernation for writting the article and all of you 
who expressed interest in the project.


And finally, a preview of what's coming next:
I've been working on adding better resampling filters. You can see 
the current results in the screenshot:


The example is a bit extreme, and jpeg compression does not help, but it's a big 
improvement.

Sunday, July 3, 2011

Python improvements, PySide

In the next release, I'm going to include PySide in Ramen's package.
PySide is a new set of Qt bindings for Python, and unlike PyQt, 
the license (LGPL) allows me to bundle it and distribute code 
the uses PySide.


I'm also adding the bits of code needed to connect PySide with C++ Qt 
widgets, Ramen's  objects and write parts of the app in Python.
The first result of this is the new SeExpression editor.


I expect to release this at the end of next week.

Monday, June 20, 2011

Release 0.8.15

I've just uploaded version 0.8.15.
This release, fixes the tracker, which was completely 
broken in previous versions. It appears to be working properly now. 

Wednesday, June 15, 2011

Release 0.8.1


Release 0.8.1 is out, with bug fixes, fixes in the linux package and some new features.


There are 3 new nodes: GenerateX, ColorX and LayerX, that use Disney's SeExpr 
to generate / color correct and composite images. DistortX will follow soon.
Also, there's a new sample folder with some examples of how to use them.


You can even replace the splash screen by your own expression. Just copy the file ui/splash.se 
in the package, edit it and copy it to $HOME/ramen1.0/ui.
Check SeExpr's site for more info.


I bundled Python 2.7 in this release, but there's not much you can do with it yet.
For now it's more of an experiment to lean how to distribute python with an application.


And finally, I added a Move3D node. It's still work in progress.
It has some cool things: it's a real 3D transformation and it concatenates 
with other (following) Move3D nodes in real 3d space.
On the other side, it doesn't have on screen controls yet 
and it's usually difficult to see what's going on and filtering quality is not 
very high. 


I plan on addressing the resampling quality issues in the next release.

Sunday, June 5, 2011

Some features: rotoscoping

Rotoscoping is one of the most important tools for any interesting compositing 
project and it's one of the areas where more work has been done developing Ramen.


In the roto node, shapes can be parented and transformed, tracks applied, 
points inserted or removed at any time, ...
Shapes are rendered with antialiasing and can have motion blur.
Of course, there's also feathering, grow / shrink and other common options.


Applying tracks to shape's individual points and importing / exporting shapes are 
left for a future update. ( Tip: Ramen's file format is very easy to parse, for example in Python.)

Friday, June 3, 2011

Color management

Ramen uses OpenColorIO for color management.
OpenColorIO (OCIO) is an open source color management project from Sony Pictures Imageworks.
It has been used on feature films like Alice in WonderlandCloudy With A Chance Of MeatballsSpiderman(s)Surf's Up, and Watchmen.


Configuring OCIO:


Ramen comes with a very basic OCIO configuration. It's recommended that you download the latest color configurations from OCIO website (download the one that says v0.7v4) and use them instead.
There are currently 4 configs: spi-vfx, spi-anim, nuke-default and iff. Please check OCIO's website for more info. In case of doubt, nuke-default is usually a good choice.


The first time Ramen is executed, it will create a ramen1.0 directory in your home directory.
The easiest way of pointing Ramen to the new color configuration is to copy the config.ocio file and the luts folder to $HOME/ramen1.0/ocio.


A better option is to create an enviroment variable $OCIO and point it to the config you want to use. This way you can use the same configuration for all programs that use OpenColorIO.
It's rumored that future versions of Nuke will use OCIO.
In the following examples, the nuke-default config will be used.

Reading images:

Ramen works in linear color space. Normally, you want to convert all input images 
to linear color space, do all processing and convert to your destination color space 
when rendering the composition.

When reading images, select the input color space in the image_in node controls.
The image will be converted from the color space picked to linear.


Viewing images:

There are controls in the viewer to modify the way the images are displayed.


From left to right, they are display device, display transform, exposure and gamma.
It's important to note that processing is not affected in any way by these controls.
They only change the way images are displayed.

Converting between colorspaces and other ops:

There are a number of nodes related to color management:

- OCIO Colorspace converts between color spaces.
- OCIO File Transform applies luts and other transformations.
- Log to Linear converts between linear and log color spaces.
- CDL can import, export and apply standard CDL ( Colour Decision List) corrections.

Image output:

The last step is converting the images to the output color space when the composition 
is rendered. This is done in the image_out node controls.


The correct color space depends on the output format and the output medium.
For EXR, HDR and floating point TIFF images, linear is the correct pick.
You'd use linear for images used as textures in 3d renderers for example.
For film output, use DPX or Cineon formats and a logarithmic color space.
Use sRGB for images to be displayed on a computer screen ( web, presentations, ...) 
and video ( rec709) for HD video.
------------------------------------------------------------------

Wednesday, June 1, 2011

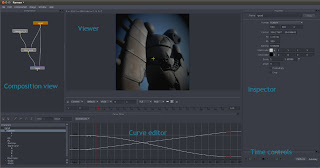
Getting started: the interface.

Window areas:


The main window contains the following areas:


You can show / hide areas using the window menu on the menu bar.

Common hotkeys:

- Alt + mouse drag: scroll.
- Alt + shift + mouse drag: zoom.
- Home key: reset view.
- Dot (.), comma (,) keys: zoom view half / double.
- Control-click / right button click: show context menu.
- Delete / backspace key: delete selection ( nodes, keyframes, ...)

Numeric input fields:

- Alt + mouse drag increases / decreases the value of the field.
- You can also use the cursor up and down keys.
- Control-click / right button click displays a context menu.
- Simple formulas can also be used.

Composition view:

- Connect nodes by dragging.
- Control click an edge to remove it..

There are two special nodes. The active node is the node being edited.
It's parameters show on the inspector and anim curves on the curve editor.

The context node is a node you can display while editing other parts of the 
composition. 

Double click on a node to make it the active node ( red outline).
Control double click to make it the context node ( blue outline). 
In the viewer you can choose which node to display using the active / context menu.

Thursday, May 26, 2011

Welcome (again)

Some of you possibly remember the old Ramen compositor. It was an open source project which unfortunately wasn't very successful. The project was closed some months ago, but development went on and the compositor was rewritten. Important new features have been added and many errors have been fixed.
This is the new aspect of the application.


Some of the changes are clear from the screenshots, for example the tracker is new. I'll post about other new features later.

I'm currently working to do an alpha release next week. For now, Linux 64 bits only.
64 bits Windows later. The new releases will be closed source.

Thank you for your interest (again).

Est.

-----------------------------------------------------------

Download Ramen

Minimum requirements:

- 64 bits Linux operating system.

- Processor with SSE2 instruction set support ( Intel Core2 or better).

- 2 Gb of Ram or more. More is better.

- Modern Nvidia video card, with OpenGL 2.0 and pixel shaders.
ATI video cards may work. Intel cards don't work.

License and other important informations:

This is an early development, alpha release.It can have bugs, 
has missing features, almost no documentation and 
parts of the application are subject to change in the future. 
Care must be taken when using the software in important projects.

This software is distributed in the hope that it will be useful, 
but WITHOUT ANY WARRANTY.

THIS SOFTWARE IS PROVIDED BY THE COPYRIGHT HOLDERS AND CONTRIBUTORS "AS IS" AND ANY EXPRESS OR IMPLIED WARRANTIES, INCLUDING, BUT NOT LIMITED TO, THE IMPLIED WARRANTIES OF MERCHANTABILITY AND FITNESS FOR A PARTICULAR PURPOSE ARE DISCLAIMED. IN NO EVENT SHALL THE COPYRIGHT OWNER OR CONTRIBUTORS BE LIABLE FOR ANY DIRECT, INDIRECT, INCIDENTAL, SPECIAL, EXEMPLARY, OR CONSEQUENTIAL DAMAGES (INCLUDING, BUT NOT LIMITED TO, PROCUREMENT OF SUBSTITUTE GOODS OR SERVICES; LOSS OF USE, DATA, OR PROFITS; OR BUSINESS INTERRUPTION) HOWEVER CAUSED AND ON ANY THEORY OF LIABILITY, WHETHER IN CONTRACT, STRICT LIABILITY, OR TORT (INCLUDING NEGLIGENCE OR OTHERWISE) ARISING IN ANY WAY OUT OF THE USE OF THIS SOFTWARE, EVEN IF ADVISED OF THE POSSIBILITY OF SUCH DAMAGE.

Download:

Get Ramen here.

Installation:

- Uncompress the package and move / copy it where you want to install it.
- Optionally, add the bin subdirectory inside the package to your PATH 
enviroment variable. On ubuntu, /etc/bash.bashrc is a good place to do it.

- To run the program, open a terminal window and type "path to the package"/bin/ramen.

--------------------------------------------

FAQ

What's the difference between the open source project and the new version?

This new version is a rewrite of the last open source release.
They are different programs with the same name.

Can I use the program to do real work?

Ramen is still alpha software. It has bugs, missing features and things subject to change.
With care, it may be possible to do real work with it, but there's no warranty.


How can I edit a node while viewing the result of another node?

Control - double click the node you want to view to make it the context node.
In the viewer, in the Active / Context menu, choose context.
Double click the node you want to edit to make it the active node.


------------------------------